 Deutsch
 English
 Español
 Français
 Italiano
 日本語
日本語 Português
 Suomi
Suomi Svenska
Digital Dogsitter Instructions and Help
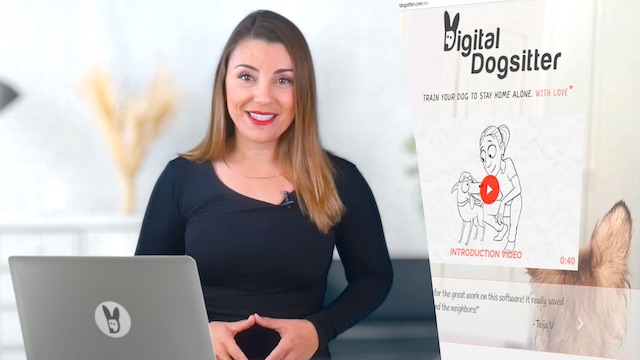
Tutorial video
Recording your dog
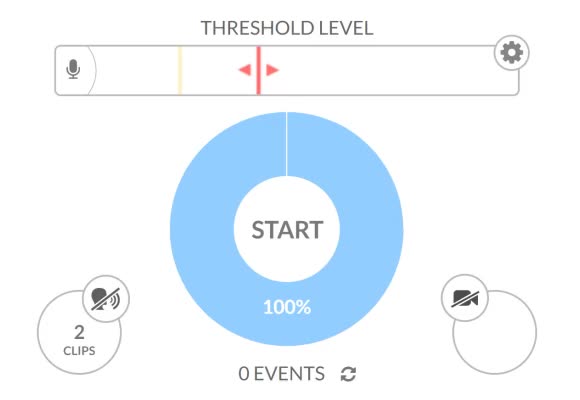
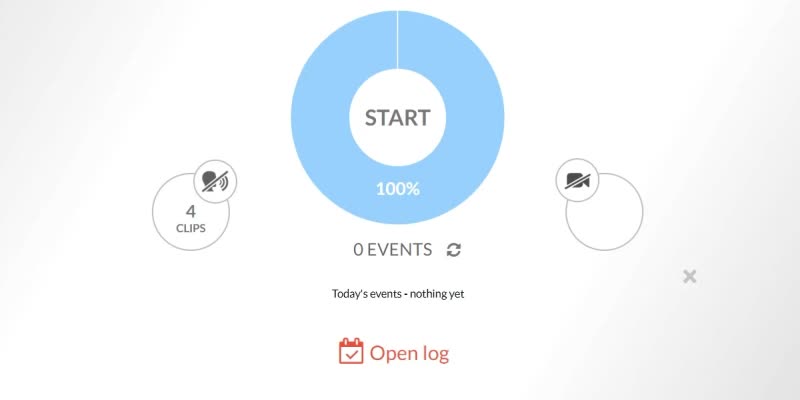
Digital Dogsitter makes it easy to see how your dog is doing at home. In the main view of the program, press Start and check that the program responds to sound from the microphone. When you make a sound, the Threshold Level bar should move accordingly.
Now the program is in active mode and records all sounds that exceed the audio threshold level.
Device compatibility
Digital Dogsitter works on most computers and mobile devices with Chrome, Firefox, and Edge browsers. You can find more information about compatible devices here.
Before you start recording, make sure that the device does not go to sleep. This is done by keeping the device connected to the power supply, and ensuring that the display does not turn off. The Digital Dogsitter browser tab should stay visible on the screen. For more information on keeping the device awake, see the FAQ.
When starting a recording session, it's a good idea to test the sound yourself to make sure the microphone is working and the program is recording sounds. If the program does not respond to sound, check the operating system troubleshooting for the microphone and try restarting your browser. More instructions for resolving microphone issues can be found here.
Camera image
In order for the application to record video addition to sound, turn on the camera from the camera icon on the right side of the Start button. The camera is active when the icon is red. If the icon is gray, the camera is not on.
To record good quality video, make sure that the space is sufficiently well lit. You can read more tips for improving the video quality here.
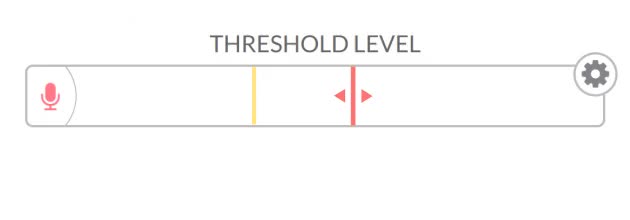
Adjusting the Threshold Level
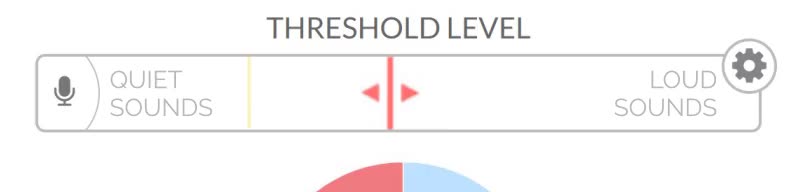
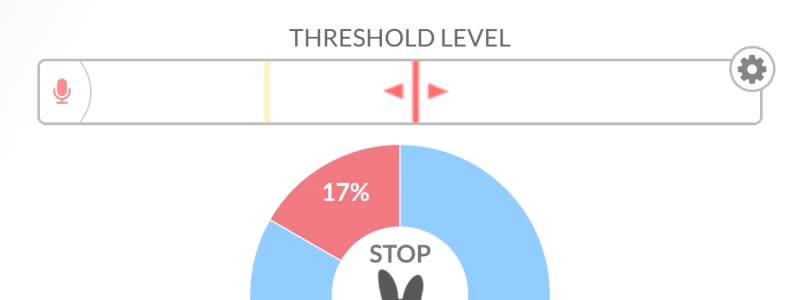
Adjust the Threshold Level so that the incoming sound volume exceeds the yellow threshold only for the sounds you want to record. In general, you should adjust the level so that only the louder sounds are stored. Otherwise, the history log might get filled with all kinds of background noises. In some situations, you may want to record even the quietest sounds to find out, for example, how much and at what time the dog is moving in the apartment.
The yellow and red thresholds are adjusted together using the same slider. To adjust the ratio of the yellow and red thresholds, click the settings icon to the right of the Threshold Level text and use the Warn level relative to the threshold slider to adjust the position of the yellow threshold only.
Normally, you need to adjust the Threshold Level only once. However, you should always check that the volume and the threshold are correct.
Monitoring your dog

Leave your home device on to record your dog. If you wish, you can log in to the Digital Dogsitter on another device at any time to watch what is happening at home. Opening the program on another device does not interfere with the recording at home.
When you return home, press Stop and watch and listen through the day's events.
Viewing events
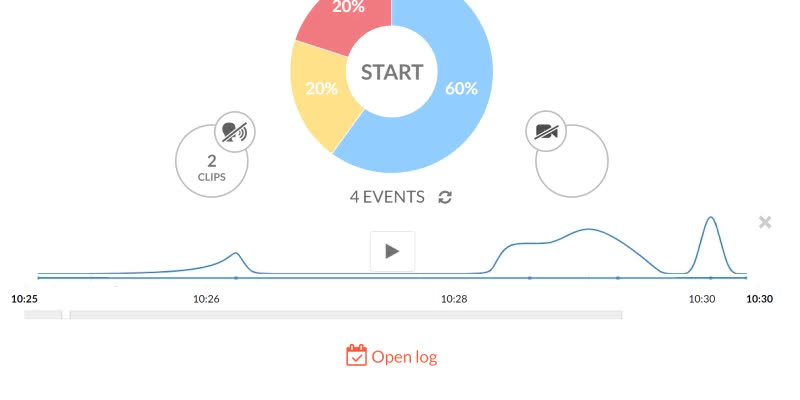
You can see the day's events on the timeline right in the main view. Clicking on the timeline, or the dots below it, opens a player view where you can listen and view the events and also see a more detailed graph of the events.
Below the main view, you will find a link to the History Log, where you can see and hear the events from previous days, too.
History Log
History Log will help you to observe the longer-term changes in a dog’s time alone. To open the History Log, press the Open log button at the bottom of the main view.
You can view the history either as a daily listing or a recording session listing. Choose the mode by clicking on either Days or Sessions at the top of the History log.
In the daily listing, the bar chart at the top shows the overall picture of the last 30 days. This will give you a good idea of how the situation has developed.
Below the bar chart, you can see the daily data. For each day, a pie chart familiar from the main view is displayed on the left, and a timeline of dog’s time alone is displayed on the right. Press the magnifying glass icon to view the day's timeline as a more detailed graph. Click on the timeline to view the events for that day in the event browser.
For each day, by clicking on Sessions, you will see a list of recording sessions for that day.
Recording sessions
For each session, you can see its duration, an editable name, the relative percentages of loud and quiet times, a timeline graph, and whether the recording has been shared with guest users.
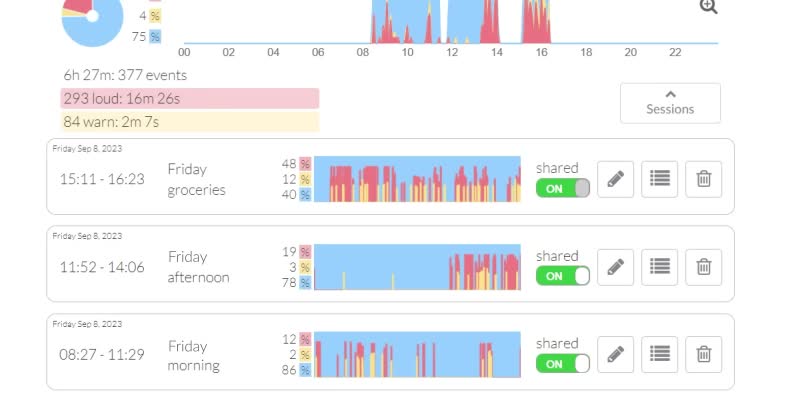
From the trash can icon, you can delete the entire session. From the pencil icon, you can access comments and notes related to the session, and from the list icon, you can open a detailed listing of events. From the event listing, you can choose to delete individual events if desired.
By clicking on the session's graph, you can view it in the event browser such that the event browser's timeline only displays that particular session, without the other recordings of the day.
You can edit the name of the session by clicking on the name text.
Continuous recording
The Continuous Recording feature allows you to capture and monitor your dog's actions in high-quality video, even when your pet remains calm. This feature is especially useful when you want to record and analyze shorter separation training sessions or share them with your trainer.
When using the Continuous Recording feature, Digital Dogsitter records normal video regardless of the set sound threshold level, meaning that the calm moments are also recorded at normal speed and are not fast-forwarded when watching the recordings as usual. You can view continuous recordings in the event browser just like any other events of the day.
You can enable or disable continuous recording at any time by clicking on the microphone icon in the left edge of the sound level bar and switching the recording mode. You can also do this remotely. Continuous recording works for up to one hour at a time, after which the program switches the recording mode back to automatic recording.
Using your voice as feedback
Digital Dogsitter can play the owner's recorded voice to the dog whenever the dog's voice volume exceeds a set threshold level. When used properly, the owner’s voice can help the dog calm down when alone.
Teaching a soothing phrase
A prerequisite for the successful use of the voice feedback is that the dog has been taught a soothing phrase. This means a word or a phrase that your dog associates with relaxing situations, and thus helps calming down. Read more detailed instructions for training at Using Voice Feedback in Dog Training.
If you have not taken the Symptom survey for voice feedback yet, you should do it before deciding to start using the Your voice feedback feature.
Recording your voice feedback
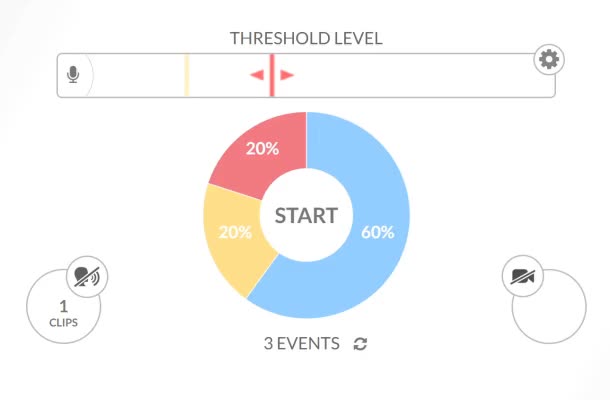
By clicking the speaking head icon on the left side of the main view, you can switch the voice feedback on or off. The icon is gray when the feedback is disabled, and red when active. If you have not yet recorded any voice feedback clips, clicking on the image of the speaking head will open a window where you can record audio clips. Otherwise, you can open the same window by clicking the circle below the head icon, which tells you how many feedback clips you have recorded.
In the Your Voice -window, you can record new voice feedback. When you see the familiar volume bar in the window, the audio clip recording is on and you can speak into the microphone. Click Record New if recording is not already on. When you speak into the microphone, the program automatically splits your audio clip according to the audio threshold indicated by the red line. After recording the calming word(s), click the Stop button and close the window.
Adjusting the Threshold Level for the voice feedback
In the main view, press Start and set the Threshold Level so that the volume meter turns red when the dog is so loud that you want your voice feedback to be played. The threshold should not be set too low so that the program does not give the dog unnecessary voice feedback. The appropriate threshold level is usually such that the voice feedback is played only after loud barking or howling.
When not to use the voice feedback
In some situations, it is better not to use the voice feedback and use Digital Dogsitter only to record and monitor the situation at home. Especially, if your dog is severely anxious when left alone, you should first concentrate on the basics of separation training before using the voice feedback.
Read a more detailed explanation of in which situations and why the voice feedback feature should not be used.
Remote connection
With Digital Dogsitter, you can monitor in real time how your dog is doing at home. You can sign in to the service on another device, such as your phone or another computer. With a remote connection:
- you can immediately see how the day has gone so far
- you can watch a live video and see what is happening right now
- you can talk to your dog via the video connection
- you can control the recording device, turn the audio feedback on or off and adjust the audio threshold level.
You can also start recording on multiple devices.
Viewing today's events
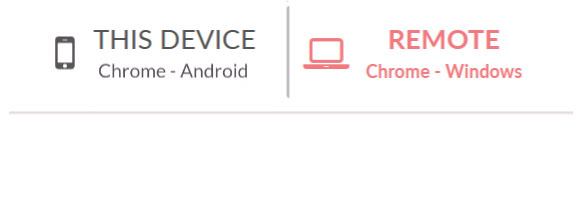
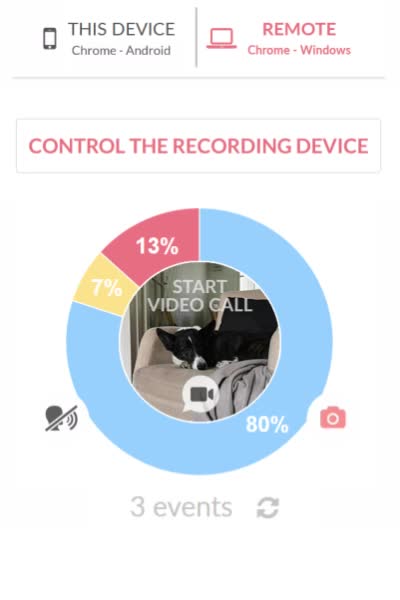
When you open the application on another device, the main view shows a list of devices at the top if you already have another device recording. The list shows This device, that is, the device that is currently in your hand, and all the other devices that are currently recording. By default, the Remote to the recording device at home is selected.
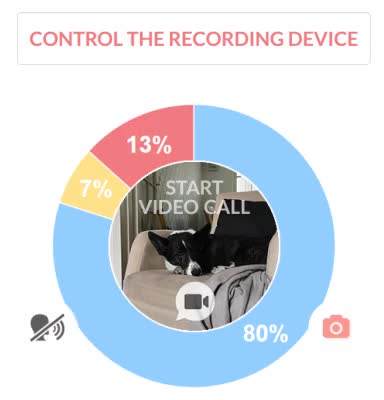
With the remote device, you can see the day's events just like on a home device. In the remote device view, the pie chart and timeline graph show events from all devices in your user account.
In the remote view, Voice Feedback and Camera icons display the status of the device selected in the device list. So when Remote Device is selected, as in the picture above, the Voice Feedback and Camera icons tell you whether the features are enabled on the recording device at home or not.
Video connection to home
Clicking the Start video call button in the center of the pie chart of the remote view opens the video call window. The video call window connects a video call between the remote and home devices.
The connection transfers video and audio from the home device to your remote device. Audio is also transferred from the remote device to the home device, so that you can talk to your dog whenever you want. To turn on/off your microphone on the device at hand, click the tap to talk and tap to mute buttons.
Controlling the recording device remotely
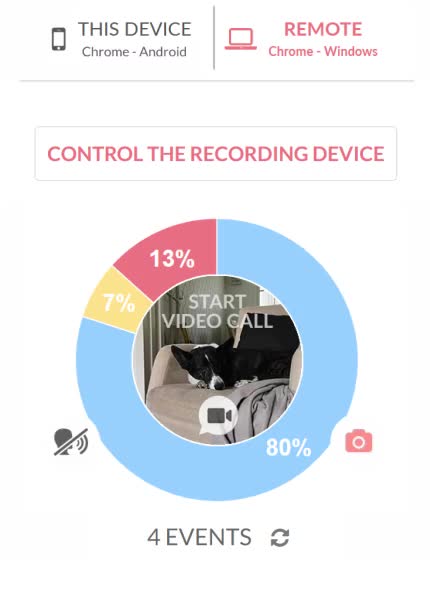
You can turn on or off the voice feedback of the recording device at home using the remote control. In the remote device view, click the Control the Remote Device button. You can then click on the Voice Feedback icon, i.e. the image of the talking head on the left side of the pie chart, to turn your voice feedback on or off. Similarly, you can click the Camera icon to the right of the pie chart to turn the camera on or off.
Note that you can also adjust the audio threshold level remotely. Be careful not to accidentally adjust the threshold, though. Adjusting the volume remotely is not recommended in normal situations, as you will not be able to experiment to find the appropriate level. However, it may be necessary to adjust it if the sound level has accidentally been set too sensitive.
Recording on multiple devices at the same time

You can start recording on multiple devices simultaneously. This can be useful if your dog is allowed to move around the apartment. If you wish, you can put a recording device in every room. The events on all devices accumulate in the same event history.
When you open the application on another device, by default you will see a remote view of the device that is already recording. To start another recording on a new device, select This Device from the device list in the main view, and then press the Start Another Recording button. This will open the normal main view, where you can start recording by pressing the Start button.
Once you start recording, the device list and remote control of other devices disappear to avoid confusion between different devices. You can then reopen the app on a third device, allowing you to remotely manage the recordings you previously launched on other devices.
Sharing
Sharing your user account
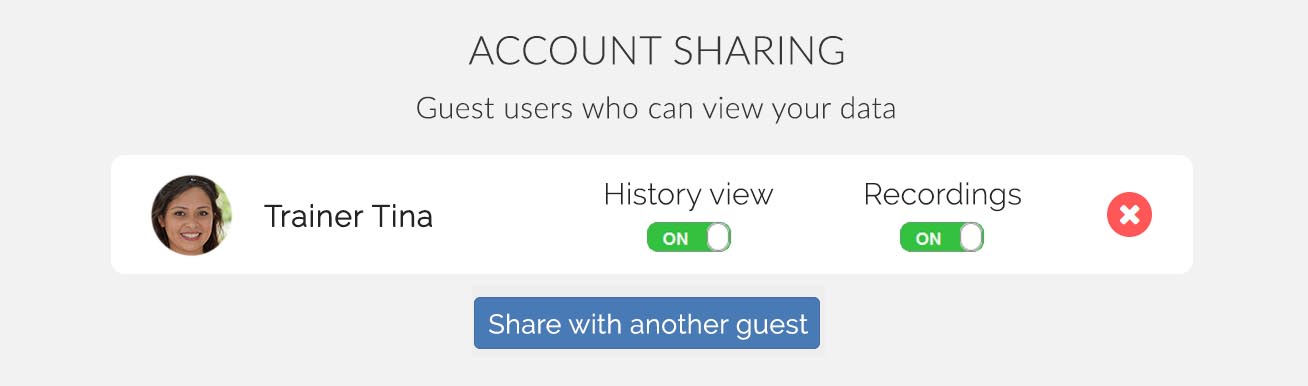
The User Account Sharing feature allows you to share your dog's History View and recordings with external parties, such as your dog trainer or family members. This feature is particularly useful if you want to get a professional's perspective on your dog's behavior during alone time or share your dog's progress with others.
Sharing a user account is easy and secure. You can share your account from the Your Account Settings page under Account Sharing. When you click Share with another guest and enter their email address, they will receive an email invitation to view the events recorded on your user account.
Once you have shared your user account, the guest can view the shared information on their own device without having to share your username or password. You can stop sharing your user account at any time by pressing the X next to the desired person's name.
Users to whom you have shared visibility to your account do not need a paid Digital Dogsitter subscription to view your account. They just need to create a free user account for the service with their own email address.
If you wish, you can turn off sharing for history and/or recordings. Visitors always have visibility to your dog profile. If the History view is shared, visitors can see the daily graphs in the history log. If Recordings are shared, they can also view and listen to recordings that you have marked as shared in the history log. New recordings are shared by default, unless you have turned the Automatically share new recordings option to OFF in the user account sharing settings.
Note that visitors can only view in detail those recording sessions that are marked as shared. For unshared sessions, visitors can see the day's summary graph, but not the session details.
Viewing a shared account
If a Digital Dogsitter user has shared their account with you, you can view their account information and activities once you've logged in to the service with your own credentials. To see another user's account, you do not need to have a paid subscription.
You can find the Shared Accounts in the user account menu.
The Shared Accounts page lists the user accounts shared with you, including links where you can view the dog profiles and history of these accounts recordings. Dog profiles contain information about the dog and results of surveys. The history section has recordings and day-by-day graphs sorted by date. If you don't see a link to the history for a user, they have not given you permission to view their historical data.
To view a user's videos, find the desired date on the history page and click on the graph for that day. This will open an event browser where you can browse through the day's events and recordings. You can navigate to a specific time of the day by clicking and sliding the marker on the timeline at the bottom of the view.
When a user shares their account, you will receive a notification via email. Note that to view another user's details, you must be logged into Digital Dogsitter with the same email address that the notification was sent to. If a friend or customer has shared their account with the wrong email address, ask them to share the account again using the email address you use for the service.
FAQ
If you didn't find what you were looking for on this page, take a look at the Frequently Asked Questions.